Orbitozygomatic osteotomy: Difference between revisions

From NeuroWiki
Jump to navigation Jump to search
No edit summary
No edit summary
 
(One intermediate revision by the same user not shown)
Line 7: Line 7:


<br clear="all">
<br clear="all">
hgfhgf
<sketchfabplaylist>7d00ec57edfa4d7d826cf115c597defc+d706788571cf4c75a7a5272fae3a7c40+f78c716033ee4f06a65816b4aae33a97+db0389b16b8043ffa3421f9c939c2be0</sketchfabplaylist>

Latest revision as of 14:07, 3 March 2024

  • This approach involves removing the zygomatic bone and part of the orbital rim
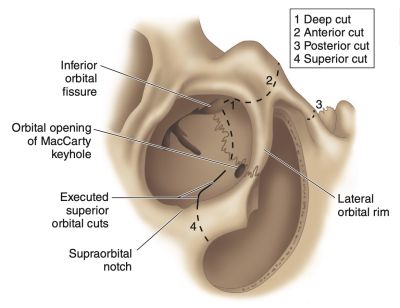
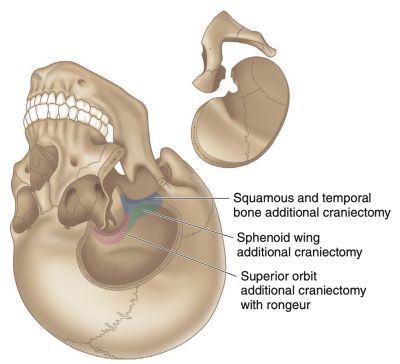
The exact location of the cuts from this osteotomy can be a source of confusion, but this can be greatly simplified if the six cuts are thought of as achieving two primary goals: two cuts to remove the superior orbit and four cuts to disconnect the maxillary buttress at its points of attachment. To take advantage of the visualization provided by the orbitozygomatic osteotomy, it is wise to perform an additional craniectomy to eliminate bony obstruction to viewing angles. The superior orbit should be removed with a rongeur as close to the orbital apex and sphenoid wing as possible. Additionally, after use of the additional temporalis retraction made possible by the zygomatic arch removal, the squamous temporal bone should be removed down to the floor of the middle fossa. If necessary, the lesser sphenoid wing should be drilled until no bony elevation exists between the globe and the anterior clinoid process.
The dura is opened in a C-shaped fashion across the sylvian fissure, with the ends of the “C” roughly bifurcating the exposed portion of the frontal and temporal lobes, and carried as anteriorly as possible. The dura is flapped anteriorly to retract the periorbita and eye out of the field and is sutured to the scalp, with the stitches into the dura placed as low as possible to retract the dura as flat and out of the working view as possible.